How Do I Increase Interchannel Delay Using NI-DAQmx or Traditional NI-DAQ (Legacy)? - National Instruments: "Using the LabVIEW API
You can manually set your convert (channel) clock using the DAQmx Timing property node. After placing the DAQmx Timing property node, left-click on the property selector and select More»AI Convert»Rate. Then, right-click on the property and select Change to Write to be able to change this property.
"
'via Blog this'
Friday, 20 September 2013
How Do I Eliminate Ghosting From My Measurements? - National Instruments
How Do I Eliminate Ghosting From My Measurements? - National Instruments: "
Select a transducer with lower source impedance.
Reduce sampling rate and increase interchannel delay to allow enough settling time for the amplifier. See KnowledgeBase 292A3QB5: How do I Increase Interchannel Delay Using NI-DAQmx or Traditional NI-DAQ (Legacy)?
Implement a voltage follower or buffer circuit to decrease source impedance to less than 1 kOhm. See KnowledgeBase 208AD10T: Decreasing the Source Impedance of an Analog Input Signal
Arrange signals to minimize voltage swings between channels.
Choose the high-impedance channel as the first channel in the scan list.
Note: This will only help if you are not sampling in round-robin mode.
Avoid multiplexing – sample one channel at a time or switch to a simultaneous sampling DAQ device."
'via Blog this'
Coupling between two AI channels - NI Discussion Forums
Coupling between two AI channels - NI Discussion Forums: "2) Channel-to-channel settling crosstalk: signals on one channel influence the measurement on the next channel in the scan sequence. When the multiplexer switches from one signal to the next, the signal at the A/D converter does not switch instantaneously from one to the other. Due to limited bandwidth of the amplifier and the A/D converter, and capacitance in the multiplexers, there is a settling time as the signal transitions from one level to the next. At first blush it usually has the shape of an exponential function, though once that part has settled out there's usually slower effects that aren't exponential. Those slower components of the settling curve are often due to thermal transients and dielectric absorption in capacitors. In any case, if the A/D converter samples the signal before it's through settling adequately to the new level, the new signal will carry some residual influence of the previous channel. Since the curve usually decreases monotonically, waiting longer to settle decreases the amount of influence. So one thing to try is to lower the channel-to-channel sample rate within each scan - if that decreases the noise, then your problem is likely related to settling."
'via Blog this'
'via Blog this'
Coupling between two AI channels - NI Discussion Forums
Coupling between two AI channels - NI Discussion Forums: "On the other hand, the input resistance is very high (> 10 Gohms), and so any charge left on an otherwise unconnected line will determine the voltage on the line. When the multiplexer switches from your connected load cell channel to the unconnected (floating) channel, the charge stored from the first channel remains in the multiplexer circuitry and holds the voltage where it was until a lower impedance is connected and can influence it. This is why the unconnected channel appears to follow the connected one."
'via Blog this'
'via Blog this'
Sunday, 15 September 2013
How do I filter out AC noise on a load cell? - NI Discussion Forums
How do I filter out AC noise on a load cell? - NI Discussion Forums:
'via Blog this'
- A sharp Butterworth filter will work (let's say 12th order with a cutoff freq of 1-2 Hz)
- The easiest way might be to average over a larger number of points to average out the 60 Hz (or 50 Hz) signal.
- A shielded and correclty grounded shield on the cable between the measurement system and the sensor.
'via Blog this'
Thursday, 8 August 2013
Friday, 26 July 2013
Tuesday, 18 June 2013
Tuesday, 28 May 2013
Concatenation - Wikipedia, the free encyclopedia
Concatenation - Wikipedia, the free encyclopedia:
In formal language theory and computer programming, string concatenation is the operation of joining two character strings end-to-end. For example, the concatenation of "snow" and "ball" is "snowball".
'via Blog this'
In formal language theory and computer programming, string concatenation is the operation of joining two character strings end-to-end. For example, the concatenation of "snow" and "ball" is "snowball".
'via Blog this'
BET: Microsoft Excel Formulas - A1 or R1C1 Notation
BET: Microsoft Excel Formulas - A1 or R1C1 Notation:
'via Blog this'
What is R1C1 Notation ? |
This is another way to create cell references which uses numbers for both the rows and columns. | ||
Cell References are displayed in terms of their relationship to the cell that contains the formula rather than their actual position in the grid. | ||
Cells are referred to by relative notation. Absolute references have numbers. Relative references have numbers in square brackets. | ||
The above formulas will be changed to the following when you switch to R1C1 notation. |
 |
Negative row numbers mean that the referenced cell is above the cell containing the formula. | ||
Negative column numbers mean that the referenced cell is to the left of the cell containing the formula. | ||
Changing to R1C1 notation will change all the formulas in that workbook. |
TEXT function - Excel - Office.com
TEXT function - Excel - Office.com:
'via Blog this'
|
|
'via Blog this'
Saturday, 11 May 2013
Sunday, 14 April 2013
Installing a Second LabVIEW Executable Uninstalls the First - National Instruments
Installing a Second LabVIEW Executable Uninstalls the First - National Instruments:
Note: Duplicating a project (using File » Save As) with an installer build specification results in the same behavior. To prevent it, right-click the installer build specification in the new saved as copy of the LabVIEW project and select Duplicate. This copies the build specification but creates a new UpgradeCode. You can retain the old build specification in the Project Explorer or delete it.
'via Blog this'
Friday, 22 March 2013
Friday, 1 February 2013
Thursday, 17 January 2013
How To Write A Simple Batch (.bat) File
How To Write A Simple Batch (.bat) File:


'via Blog this'
Step 1: Create A BAT File
Create a new text document on your desktop. Double click the file – it should be blank inside. Now, go to file>save as, and in the “Save As” window, input a name for your BAT file and then add a “.bat” on the end (without the quotes). My file was named testBAT.bat, for instance.
Before hitting save we need make sure that Windows doesn’t stick the standard “.txt” ending on the end of our new file. To do this, change the filetype from “.txt” to “all files” as shown in the screenshot below. That’s it – hit save and close the file.
Step 2: Learn Some Quick Code
If you know how to run commands in the command prompt, you’ll be a wiz at creating BAT files because it’s the same language. All you’re doing is telling the command prompt what you want to put in through a file, rather than typing it every time you run the command prompt. This saves you time and effort; but it also allows you to put in some logic (like simple loops, conditional statements, etc. that procedural programming is capable of conceptually).
There are SEVEN simple commands I want to familiarize you with for this program. Commands are NOT case sensitive, so don’t worry about that.
TITLE - The Window name for the BAT file.
ECHO - the “print” statement for BAT files. Anything following the word ECHO will be displayed in the command prompt as text, on its own line.
ECHO OFF – BAT writers typically put this at the beginning of their files. It means that the program won’t show the command that you told it to run while it’s running – it’ll just run the command. I’d recommend that after you run this test program, you try removing this line from your code to see what happens.
PAUSE - This outputs the “press any key to continue…” message that you’ve seen all too many times. It’s helpful because it pauses the BAT file execution until the user tells it to go again. If you don’t put this in your program, everything will speed by and end before you can see it. People typically put this in BAT files to give the user a chance to review the material on the screen before continuing.
CLS - Clears the DOS window (helpful if things get too cluttered!).
IPCONFIG – Outputs a lot of network information into your DOS box (network admins have dreams solely based off this command).
PING - Pings an IP, letting you know if your computer was able to contact it. This command also returns the latency (ping time) and by default pings three times.
Step 3: Do Some Quick Logic
We need to plan our program out. Any good programmer will think about the general framework of their program before they dash into things – it prevents them from making logic mistakes that are hard to back out of.
For this program, we want to check the computer’s network/internet settings with an “ipconfig /all” command, and then review that information by giving the user time to read everything. Afterwards, we want to ping google.com to figure out if we really truly have access to the internet. We’ll pause the program after this as well, because we want to know for sure that they saw it. OK. Very simple program, very simple logic. Let’s write some code.
Step 4: Write Your BAT File
Right click your BAT file and click “edit” to bring up Notepad. The whole document should be blank – ready for some epic programmer input.
Rather than walking you line by line through the code (it’s extremely short) I’m going to use a code comment (example– CODE ::Comment) to let you know what we just did.I’m putting the actual code in bold to make things a bit easier to process.
———–Start Code———–
ECHO OFF
::CMD will no longer show us what command it’s executing(cleaner)
ECHO As a network admin, I’m getting tired of having to type these commands in! Hopefully, this saves me some time in the long run.
:: Print some text
IPCONFIG /ALL
:: Outputs tons of network information into the command prompt
PAUSE
:: Lets the user read the important network information
PING www.google.com
:: Ping google to figure out if we’ve got internet!
ECHO All done pinging Google.
::Print some text
PAUSE
:: Give the user some time to see the results. Because this is our last line, the program will exit and the command window will close once this line finishes.
———–End Code———–
Step 5: Run Your BAT File
Save the file you just coded (or copy/paste mine in, it will run as written), and double click it. Your output should be something like the screenshot below.
Congratulations! You’ve written a batch file successfully.
If you want to learn more about bat files, I’d recommend you check out the commandsavailable to the language. From there, your best bet is to write your own, or follow moreexamples online. Feel free to comment here if you have a BAT-related question.
The most useful BAT I’ve made so far is one that allowed me to compile and run Java programs with a single command, saving me countless amounts of command typing in the long run (because I compile/run so often when programming). I’ve also made one that sets file associations up the way I want them when I plug in my flash drive to a PC – this makes it possible for my portable apps to be the default app right from the get-go with a new computer.
Have you written anything cool with BAT files before?
'via Blog this'
Friday, 11 January 2013
Calling a VI by Reference - Developer Zone - National Instruments
Calling a VI by Reference - Developer Zone - National Instruments:


The type specifier forces the refnum to carry the connector type information with it. This is important for the Call By Reference Node, available on the Application Control palette, which allows us to call the dynamically loaded subVI from the main VI, as shown.
Note that when we finish the call, we close the VI reference. The advantage of making this sort of call is that the subVI is in memory only from the open to the close, rather than during the entire execution of the program.
Another advantage of this method is that multiple subVIs can be called from the same node, as long as they all have the same connector type. For example, suppose that we have a set of data files where each contains a VI name and two numbers.
The two numbers should be passed to the specified VI. We want to process all of the data files at once. We can write a VI that loops around and dynamically loads and executes each file, as shown.

After allowing the user to select a directory in which the .op files exist, the VI gets a list of all .op files in the directory. For each file, inside the loop, it reads the first three lines of the file and passes the data to a Scan from String function that extracts the VI name (first line) and the two numbers. We can then dynamically load the Add, Subtract, or Multiply VI, compute the result of the specified operation, and display it via the output indicator.
Not only does this simplify the code for the VI, since the statically linked method would require a case structure, but it also allows us to easily expand the functionality if any new operations are necessary in the future, such as a Divide VI. All that is necessary is to create the new function, making sure that it has the same connector type, and to place it in the same location as the other function VIs. The main VI's code would remain identical.
'via Blog this'
LabVIEW can link to subVIs by two different methods, static and dynamic. Statically linked subVIs are the normal subVIs that are dropped on the block diagram of the main VI. A statically linked subVI is loaded into memory at the same time the main VI is loaded. Thus, it takes memory during the entire execution of the main VI, even if the subVI executes only once. However, with dynamic linking, subVIs are not loaded until specifically instructed by the code of the main VI. This enables the programmer to create programs that take less memory during run-time.
VI Server is used to make dynamic calls. To make the call, first open a reference to the VI using Open VI Reference, available on the Application Control palette .
.
VI Server is used to make dynamic calls. To make the call, first open a reference to the VI using Open VI Reference, available on the Application Control palette
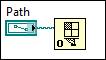
A required input for the Open VI Reference is “vi path”. “Vi path” accepts a string containing the name of the VI that you want to reference or a path to the VI that you want to reference. To call by path, use the File Path Control available in the String and Path palette and browse for the file location. 
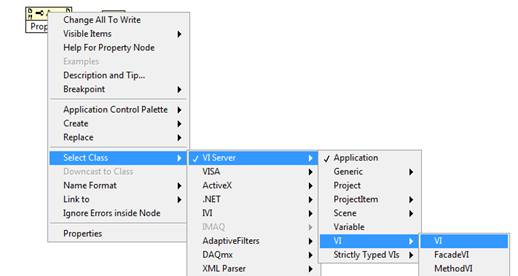
Alternatively, especially if the file path to the VI may change, open the reference by name. To open the reference by name, create a Property Node and right click on it to choose Select Class»VI Server» VI»VI. (or create a String Control containing the full delimited name of the VI in memory)
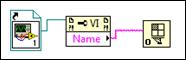
Now, click on Property to select VI Name. Add a static VI reference to the block diagram and right click on it to select Browse for Path… to choose the desired VI. Wire everything up as shown below. The Open VI Reference VI will now search memory for the VI with the designated name.
Next, now that we have a “vi path” wired up, we will make use of the "type specifier VI refnum" to specify what type of VI we are opening. By "type" we mean what the connector looks like. Wire up to the type specifier any VI refnum that has the same connector type as the VI that we are opening. Usually this is done by creating a constant VI refnum and selecting a VI with the appropriate connector. This extracts the connector information and stores it in the control, as shown.
On this call of Open VI Reference, we will make use of the "type specifier VI refnum" to specify what type of VI we are opening. By "type" we mean what the connector looks like. Wire up to the type specifier any VI refnum that has the same connector type as the VI that we are opening. Usually this is done by creating a constant VI refnum and selecting a VI with the appropriate connector. This extracts the connector information and stores it in the control, as shown.
The type specifier forces the refnum to carry the connector type information with it. This is important for the Call By Reference Node, available on the Application Control palette, which allows us to call the dynamically loaded subVI from the main VI, as shown.
Note that when we finish the call, we close the VI reference. The advantage of making this sort of call is that the subVI is in memory only from the open to the close, rather than during the entire execution of the program.
Another advantage of this method is that multiple subVIs can be called from the same node, as long as they all have the same connector type. For example, suppose that we have a set of data files where each contains a VI name and two numbers.
doc1.op | doc2.op | doc3.op |
| add.vi 4.3 2.5 | subtract.vi 5.6 3.4 | multiply.vi 2.0 6.0 |
The two numbers should be passed to the specified VI. We want to process all of the data files at once. We can write a VI that loops around and dynamically loads and executes each file, as shown.
After allowing the user to select a directory in which the .op files exist, the VI gets a list of all .op files in the directory. For each file, inside the loop, it reads the first three lines of the file and passes the data to a Scan from String function that extracts the VI name (first line) and the two numbers. We can then dynamically load the Add, Subtract, or Multiply VI, compute the result of the specified operation, and display it via the output indicator.
Not only does this simplify the code for the VI, since the statically linked method would require a case structure, but it also allows us to easily expand the functionality if any new operations are necessary in the future, such as a Divide VI. All that is necessary is to create the new function, making sure that it has the same connector type, and to place it in the same location as the other function VIs. The main VI's code would remain identical.
'via Blog this'
Subscribe to:
Comments (Atom)